Our media shoot took place on two separate days. This is because our thriller idea was based on unlicensed taxis picking up girls and we thought that filming in night time would be more realistic. The first shoot took place In Guildford at around 4 o clock in the afternoon. Luckily were still in the time of the year when it gets dark early so we were able to get the shots we needed. Using Guildford as our first location was really to establish where the victim was when she got into the taxi. Even though we only filmed around three or four angles that extra bit of footage will play a big part in our opening sequence and make it a higher quality piece of footage.
When we arrived at Guildford we spent no time hanging around and got straight down to it. We chose ‘The Drink’ nightclub as the location for our actress to walk out from. So we set up our camera across the street in order to pan down the entire building till we reached the victim stepping out and putting on her jacket. Looking back on our footage I found out that it was a very long shot of about 10 seconds but I think when we edit it all together it will look good.
Before we continued with the rest of the more challenging shots one of us had to go to the nearby taxi rank in order to pay a black cab to position himself outside the club and drive away when our victim walked out onto the street. Luckily there was one black cab there who agreed to do what we asked, even though on the first take he didn’t pull away but asked our victim to get in. However on the second take he drove away in order for our unlicensed taxi to pull up on the kerb.
When we were filming from this angle we had to place our camera and tripod on the side walk where a lot of pedestrians were walking by. This made it hard to get a good natural shot without the public knowing what was going on. However amongst all the Guildford footage we got we should be able to cut together a good introduction sequence before we move onto the interior footage.
Looking back at our original storyboards our shoot days didn’t actually go too different to what we planned which surprised me. We had planned to go to the nightclub in Guildford for our opening shot, however we made our lives a lot easier by just filming her get into the taxi instead of adding in the whole act of her dropping her bag, the taxi driver picking up her ID etc. Instead we changed the script later on in the interior footage.
From day one we were always aiming for a thriller effect for our shoot days. Even before we have edited our footage and added the music, text etc I’m certain that we have achieved the effect of the thriller. I think this was due to two things, the fact it was filmed at night in quite a dodgy looking location of a girl on her own, and the script we used in the end.
When it came to filming our group took it in turns to film each shot. In Guildford we did a shot each of our victim getting in the car. We did these shots in order to make our victim to look venerable and alone in the dark with only streets lamps which created a feeling of isolation. However when it came to shooting on our second day outside the studio at school there were a lot more tasks needed to be done in order to set up. Again it was dark because this is when we wanted to use stage lights to create the false impression that cars were passing by. We had two lights to use, one on each side of the car, one white and the other red. I had to set up the red light inside the shed so it was out of the rain but able to show up on our actors effectively.
On the second shoot day we had to set up outside the studio because all of our footage had to be inside our unlicensed taxi. Using the inside of the car and creating all the artificial lights and movements you would experience when driving in a car at night and in the rain all helped towards creating the mis-en-scene that would relate to the genre of film that we are making. I chose to do particular shots such as the taxi drivers eyes looking at the girl in the rear view mirror and a close up of her having no signal on her phone to call for help in order to create a sense of fear and create suspense. I think that the interior shots of the taxi worked really well with the lighting and rain effects we used. It made the footage look really realistic and give it a thriller edge to it.
For costume we decided to dress our girl in all black. This is a contrast to the stereotypical all white innocent look but we wanted her to appear streetwise so that she would be able to work out what’s happening to her and how to try and escape throughout the film. For our taxi driver we decided to make him dress in casual clothes-a black leather jacket as well. In his case we dressed him that way to make him appear like the villain and also make him appear like less of an official taxi driver. For props we needed to use a student ID so that it made the plot more realistic-that our taxi driver had been stalking her at her university and stole her identification as a memento. We were also planning on using a hose to create the false effect of rain but luckily it was actually raining on the day of our shoot so we just had to use a small spray bottle to use on the windscreen to make the rain look a bit heavier. We decided to use rain because it is a convention of a thriller/horror film which creates the fear factor for the audience.
When it came to casting we chose to cast our victim because she had a very innocent look to her yet mature. She would also appeal to our target audience for the males because she is a good looking actress. We chose to cast our taxi driver because we needed someone older to make it more realistic. If we had casted a 17 or 18 year old guy it wouldn’t be very believable.
In terms of lighting we chose to film outside when it was dark with the use of artificial lighting. This is because the darkness is a typical convention of a thriller/horror film. We didn’t use lighting on our first shoot day because we were out in Guildford and couldn’t set up lights in the street. However on the second shoot day we used two stage lights, one white, one red, on each side of the car and moved them back and forth every couple of seconds to make it look like cars driving past. When we looked back over the footage the lighting inside the car had worked really well, however some of the shots showed that it was in fact a stage light being moved back and forth, which eliminated the realistic effect of cars passing by. Hopefully when it comes to editing we will be able to fix this problem.
In terms of sound before editing we only had a couple of instances. One would be the car door slamming, which was a lot louder than the dialogue and creates suspense. It was a good use of sound to use for cutting to another shot also. We also had the sound of the rain hitting the car which created an atmosphere which was lingered with tension and suspense.
When it came to filming we alternated roles. I took part in filming, setting up the scene, the lights, deciding shot choices and creating the script used for our thriller. It was important that we all worked together and discussed options so that we got different opinions and as a group decided what would be best for our thriller.
Overall I was very happy with the outcome of our thriller. The shot day arose above my expectations and we achieved the thriller that I had imagined in my head. If we were to do it again I would do nothing differently.
Saturday, 22 January 2011
Friday, 21 January 2011
Thursday, 20 January 2011
Wednesday, 19 January 2011
Analysis of the title sequence of 'Seven'
In order to gain some more ideas before starting to produce our own title sequence of a thriller we were told to do some research by looking at other well known thriller title sequences. I chose to look at the movie 'Seven' which is a film about a seriel killer. Unlike the title sequence to such thrillers as 'Panic Room' the movie 'Seven' gives away a lot of detail to tell you what the film is about.
The title sequence of 'Seven' consists of a series of shots of what seems to be someone producing a considerable amount of work and research of particular victims. There are also a couple of shots where it shows the subject removing the skin from his fingertips which suggests that s/he is trying to keep their identity hidden, which suggests that they are perhaps trying to remain unsuspected from a crime they are going to commit.
Furthermore the music and text used in this sequence all link into the sterotypical image of a thriller. The text used in this opening sequence to introduce the actors, producers, directors etc is written in what is suppossed to look like the cereal killers handwriting. It is also given an effect to flicker on screen, along with the use of slow eary music which gives off a strong impression that this film is a thriller.
All the detail used in this opening sequence is a contrast to the thriller 'Panic Room' which is a series of shots of skyscrapers in New York City. The only information given away in that sequence is the location whereas more of the plot is revealed in the title sequence of'Seven'.
The title sequence of 'Seven' consists of a series of shots of what seems to be someone producing a considerable amount of work and research of particular victims. There are also a couple of shots where it shows the subject removing the skin from his fingertips which suggests that s/he is trying to keep their identity hidden, which suggests that they are perhaps trying to remain unsuspected from a crime they are going to commit.
Furthermore the music and text used in this sequence all link into the sterotypical image of a thriller. The text used in this opening sequence to introduce the actors, producers, directors etc is written in what is suppossed to look like the cereal killers handwriting. It is also given an effect to flicker on screen, along with the use of slow eary music which gives off a strong impression that this film is a thriller.
All the detail used in this opening sequence is a contrast to the thriller 'Panic Room' which is a series of shots of skyscrapers in New York City. The only information given away in that sequence is the location whereas more of the plot is revealed in the title sequence of'Seven'.
Friday, 14 January 2011
Shooting Script
• Abby is really upset having just broken up with her boyfriend, she is standing in the rain waiting for a cab
• Tomasz: you alright love, want a cab?
• Abby : Thanks , How much will it be to get to 54 Cavendish road
• Tomasz: Oh I think about £20 will cover it
• Abby: Ok
• Abby: struggles to pick up her suitcase
• Tomasz: Want a hand?
• Abby: Yeah, thanks
• Tomasz goes to put Abby’s suitcase in the boot. Whilst doing so Abby is looking for her phone in her handbag and accidentally drops her bag on the floor-the contents falling out.
• Abby: Shit
• Tomasz: don’t worry ill get that get in the car (Picking up the contents of her bag from the road he hands the bag to her).
• Abby: Okay let me see how much I have got… (Pause)… Oh no I’ve lost my purse fuck sake today is not my day.
• Tomasz: How much you got?
• Abby: I have a tenner in my pocket (She shows him the £10 note)
• Tomasz: (looking through her purse at her ID cards) Don’t worry, you go to Warwick don’t you? You can pay me back there ill give you my card.
• Abby: Oh I didn’t know you went to Warwick? Thanks that’s great
• Tomasz: yeah on my third year now.
• Abby: oh what are you studying?
• Tomasz: Psychology.
• Abby: oh really? I’ve never seen you around.
• (all goes silent. After a few seconds another voice is heard through the taxi radio)
• Other Man(Russian): Mate after the job your on I’ve got another one for you
• Tomasz (Russian): I don’t think this one will be going home, she’s a looker.
• Abby: Excuse me, sorry, my flats that way. (points right)
• Tomasz: nahhhh I know a better route.
• (she falls asleep on the back seat)
• Tomasz (Russian): I’m Almost here get ready.
• Other Man (Russian): Ok great see you soon.
• (BLACK OUT)
• (Sounds of doors Slamming and a loud scream from the men who are shouting in Russian. )
• Tomasz: you alright love, want a cab?
• Abby : Thanks , How much will it be to get to 54 Cavendish road
• Tomasz: Oh I think about £20 will cover it
• Abby: Ok
• Abby: struggles to pick up her suitcase
• Tomasz: Want a hand?
• Abby: Yeah, thanks
• Tomasz goes to put Abby’s suitcase in the boot. Whilst doing so Abby is looking for her phone in her handbag and accidentally drops her bag on the floor-the contents falling out.
• Abby: Shit
• Tomasz: don’t worry ill get that get in the car (Picking up the contents of her bag from the road he hands the bag to her).
• Abby: Okay let me see how much I have got… (Pause)… Oh no I’ve lost my purse fuck sake today is not my day.
• Tomasz: How much you got?
• Abby: I have a tenner in my pocket (She shows him the £10 note)
• Tomasz: (looking through her purse at her ID cards) Don’t worry, you go to Warwick don’t you? You can pay me back there ill give you my card.
• Abby: Oh I didn’t know you went to Warwick? Thanks that’s great
• Tomasz: yeah on my third year now.
• Abby: oh what are you studying?
• Tomasz: Psychology.
• Abby: oh really? I’ve never seen you around.
• (all goes silent. After a few seconds another voice is heard through the taxi radio)
• Other Man(Russian): Mate after the job your on I’ve got another one for you
• Tomasz (Russian): I don’t think this one will be going home, she’s a looker.
• Abby: Excuse me, sorry, my flats that way. (points right)
• Tomasz: nahhhh I know a better route.
• (she falls asleep on the back seat)
• Tomasz (Russian): I’m Almost here get ready.
• Other Man (Russian): Ok great see you soon.
• (BLACK OUT)
• (Sounds of doors Slamming and a loud scream from the men who are shouting in Russian. )
Why Did We Use These Props?
Car- To use as an unlicensed taxi
Hose Pipe- To create the effect of rain and make the false impression of a moving taxi more realistic.
Bag- To carry her belongings and for her to drop it on the floor in order for the taxi driver to help pick up the contents and steal her purse.
Student ID- To show that she is at university which will suggest her age and also allow the taxi driver pretend that he goes to the same university.
Taxi Radio- So that the interior of the car looks more like a taxi and also for the taxi driver to communicate with the guy he's working with.
Tuesday, 30 November 2010
Monday, 29 November 2010
Thriller/horror ideas
Thriller Ideas
View more presentations from hurtwoodhousemedia5.
Tuesday, 23 November 2010
My Thriller Idea- "Possession"
For my idea I decided to use the concept of the paranormal. The first shot would be an ariel shot of a girl in her bed at night. She is having a nightmare and you can tell by her twitching and panicked facial expressions. Then we hear a faint sound enter the room that can't be explained or understood. All of a sudden the girl stops fidgeting and she is dead still (This is suppossed to suggest that her body has been possessed).
Her covers are then taken off her onto the floor by an unseen presence. She sits up in her bed and puts her legs over the side in a very slow motion. Her facial expression is a constant dreary gaze as if she is sleep walking. She then walks out of her room, through her house until she reaches outside (a shot of her shadow on the wall as she walks downstairs).
We then cut to a graveyard where she has walked to. It is now early in the morning because it would be easier to film this part during the day, the frosty or misty morning adding to the effect of a thriller (also this suggests that she has been walking for a long time). She is standing in front of an empty grave that has been dug for a funeral. Her gaze is fixed on the grave and then we see her slowly lean into the grave and fall, the screen blacking out just before we see her whole body dissappear into the grave.
During the night time scene at the begginning before the graveyard I would prefer to use a night vision camera because I think it would make the footage scarier.
I also thought about what sound I would use in this thriller. Many of the hurtwood videos I have watched havn't used a song during their opening scene because the other sound effects used create more suspence. However even though it's an early though proccess I though the song 'Sweet Dreams' by Marilyn Manson would be a good song to use in my thriller.
http://www.youtube.com/watch?v=m6VojYGrnpg
Try to just listen to the song instead of watch the video because it's pretty weird.
Her covers are then taken off her onto the floor by an unseen presence. She sits up in her bed and puts her legs over the side in a very slow motion. Her facial expression is a constant dreary gaze as if she is sleep walking. She then walks out of her room, through her house until she reaches outside (a shot of her shadow on the wall as she walks downstairs).
We then cut to a graveyard where she has walked to. It is now early in the morning because it would be easier to film this part during the day, the frosty or misty morning adding to the effect of a thriller (also this suggests that she has been walking for a long time). She is standing in front of an empty grave that has been dug for a funeral. Her gaze is fixed on the grave and then we see her slowly lean into the grave and fall, the screen blacking out just before we see her whole body dissappear into the grave.
During the night time scene at the begginning before the graveyard I would prefer to use a night vision camera because I think it would make the footage scarier.
I also thought about what sound I would use in this thriller. Many of the hurtwood videos I have watched havn't used a song during their opening scene because the other sound effects used create more suspence. However even though it's an early though proccess I though the song 'Sweet Dreams' by Marilyn Manson would be a good song to use in my thriller.
http://www.youtube.com/watch?v=m6VojYGrnpg
Try to just listen to the song instead of watch the video because it's pretty weird.
Saturday, 20 November 2010
Analysis of Opening Sequence 'Dawn of the Dead'
Friday, 19 November 2010
Denotation and Connotation of Horror movies
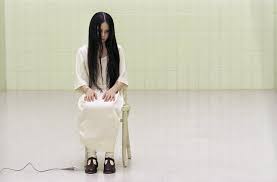
Just by looking at a still image within a movie you can tell what genre it belongs to by analysing the denotation and the connotation of the image. As a class we looked through several images from various horror movies such as 'The Ring' and 'Psycho' to pick out the clues that tell us this image belongs to a horror movie.
Still from 'The Ring'
Denotation-a girl with long black hair Connotation-looks mentally ill
-wearing a white dress -perhaps in a mental hospital
-in a white room -disturbed
-microphone by her feet
Still from 'Gothika'
Still from 'The Ring'
Denotation-a girl with long black hair Connotation-looks mentally ill
-wearing a white dress -perhaps in a mental hospital
-in a white room -disturbed
-microphone by her feet
Still from 'Gothika'
Denotation-woman looking at blood coated wall
- 'not alone' is written on the wall
Connotation-obviously a victim
-being followed
-blood signifies danger
Codes and Conventions of a Horror/Thriller
All horror/thriller movies tend to use the same codes and conventions to have an effect on their audience. There are many conventions that are used in horror movies which successfully scare or thrill the audience. I think one of the most important conventions to be used in a horror/thriller movie is the music. The music used in any film determines the mood so when scary music is played in a movie you automatically know something bad is about to happen. However the use of no sound can also be just as effective when creating suspence in a horror/thriller e.g silence before the villan jumps out to scare the victim. Amoungst the class we probably came up with over 200 conventions of a horror movie alltogether. However i will just list a few to give an idea of the range of aspects used to scare the viewer.
-gore
-death
-darkness
-chasing
-screaming-storms
-weapons-abandoned houses
-haunted places
-cloaked figures
-masks
-insects
-blood
-dolls
-shadows-horses
-monsters-dark woods
-batsAll of these have been effectively used in horror/thriller movies.
Tuesday, 9 November 2010
Editing our Preliminary Task
The editing part of our preliminary task turned out to be more challenging seeing as most of us had never done it before so the programme was new to us. However one person in our group was more advanced than us. This worked to our advantage because instead of just one of use doing all the editing on their own the whole group participated in editing and with the slight guidance from our more experienced friend. This way we quickly picked up on how to use the different tools on the programme. We learnt how to drag and drop to place shots on the timeline in the right order, how to condense sound and how to cut the different shots exactly where we wanted so when we cut the shots they matched well.
When it came to cutting the different shots together we all participated in stating our opinion on which shots to use where. At first it was difficult but once we all got used to it it turned out to be getting easier and more enjoyable.
Preliminary Task Evaluation
For the preliminary task my group filmed in the media studio whilst others filmed in various classrooms. I think that this location worked to our advantage because an office scene was used as our background,making our short film seem more realistic rather than using a classroom to set the scene for quite a dramatic script.
During filming the four people in my group including me took turns to try out the different roles in filming. Before we started to film we all took part in setting up the scene; arranging the objects and positioning the lights for the best effect in our opinion. The two roles that we alternated between were the director and the camera man. When I was a director I made sure that everything was in the right position before we began to film, then when i was satisfied with the set I would tell the room to 'stand-by', instruct the camera man to 'role camera' then shout 'action' until the scene was finished which is when i would shout 'cut'. We all participated in the camera angles used in the scene and the camera man was in charge of setting the white balance and recording the scene.
Most groups had the oportunity of using stage lights for our preliminary task. Our group used two lights in our task in order to get rid of the shadows on the back wall because we thought the scene would look better filmed that way. At first we only used one light but it was only effective when we used two lights to get rid of the shadows.
We found that setting up the camera now came easily to us since we had been practicing before and luckily we remembered before we started shooting each scene to check the tripod was level by 'bubbling' it so our shots all came out straight. Framing the shots was found to be more of a challenge because at the time we thought a couple of shots were well framed but when it came to editing it turned out we were a bit too close in and subsequently we cut off a bit of our actress' head. The lighting equipment was far back out of the shot so we didn't have that mistake of accidently including the lights in our shot.
We chose appropriate angles for a couple of our shots. We used a high angle shot on our victimin in the scene whilst we used a low angle shot at the other actress. We used these to show the contrast in power between both people, the high angle shot to show the powerless victim whilst the low angle shot showed the powerful villan. We also used quite a few close up shots in order to capture the expression of fear and anger on each charactors face. A few still shots were filmed of the object we used in our scene just incase we wanted to add that in when editing the scene.
When filming the shots we were using a specific script which we did follow to some extent but we just changed a few words in order to fit in with our particular scene. Whenever we used a different angle to film a shot we went through the entire scene in that angle, that way when in came to editing we would be making the job a lot easier for ourselves because we could cut and paste which part of the scene we wanted in that specific angle.
When it came to the 180 degree rule we remembered to shoot on the same side of the line the whole way through so thankfully we didn't break it. At first using the appropriate terminology on set so everyone knew what was happening was a bit strange a took some getting used to but by the end of the task we had all gotten used to using the right terminology.

During filming the four people in my group including me took turns to try out the different roles in filming. Before we started to film we all took part in setting up the scene; arranging the objects and positioning the lights for the best effect in our opinion. The two roles that we alternated between were the director and the camera man. When I was a director I made sure that everything was in the right position before we began to film, then when i was satisfied with the set I would tell the room to 'stand-by', instruct the camera man to 'role camera' then shout 'action' until the scene was finished which is when i would shout 'cut'. We all participated in the camera angles used in the scene and the camera man was in charge of setting the white balance and recording the scene.
Most groups had the oportunity of using stage lights for our preliminary task. Our group used two lights in our task in order to get rid of the shadows on the back wall because we thought the scene would look better filmed that way. At first we only used one light but it was only effective when we used two lights to get rid of the shadows.
We found that setting up the camera now came easily to us since we had been practicing before and luckily we remembered before we started shooting each scene to check the tripod was level by 'bubbling' it so our shots all came out straight. Framing the shots was found to be more of a challenge because at the time we thought a couple of shots were well framed but when it came to editing it turned out we were a bit too close in and subsequently we cut off a bit of our actress' head. The lighting equipment was far back out of the shot so we didn't have that mistake of accidently including the lights in our shot.
We chose appropriate angles for a couple of our shots. We used a high angle shot on our victimin in the scene whilst we used a low angle shot at the other actress. We used these to show the contrast in power between both people, the high angle shot to show the powerless victim whilst the low angle shot showed the powerful villan. We also used quite a few close up shots in order to capture the expression of fear and anger on each charactors face. A few still shots were filmed of the object we used in our scene just incase we wanted to add that in when editing the scene.
When filming the shots we were using a specific script which we did follow to some extent but we just changed a few words in order to fit in with our particular scene. Whenever we used a different angle to film a shot we went through the entire scene in that angle, that way when in came to editing we would be making the job a lot easier for ourselves because we could cut and paste which part of the scene we wanted in that specific angle.
When it came to the 180 degree rule we remembered to shoot on the same side of the line the whole way through so thankfully we didn't break it. At first using the appropriate terminology on set so everyone knew what was happening was a bit strange a took some getting used to but by the end of the task we had all gotten used to using the right terminology.

Monday, 11 October 2010
Introduction to video camera
In last weeks lessons we began to use video cameras at our first attempt of filming. First of all we learnt how to set up the tripod. The tripod comes in handy to capture steady footage and creating effective panning shots without the camera moving all about the place. However handheld shots are useful to create an action or panic effect of whatever scene your filming. By unlocking the legs and extending them to the right height before locking them in place again we were then ready to face the video camera. We slid the camera onto the top of the tripod and this is when the bubbling came to use.
Bubbling is kind of like a spirit level, it helps you set up the camera straight so your footage isn't wonky. You place one hand ontop of the camera, still loose and the other hand below the surface of the tripod where there is a wheel you tighten and loosen in order to fix the camera in the right place. Once you've moved the camera around to get the bubble in the centre of the green circle you tighten the wheel to fix the camera into place.
Now onto the technical side of filming. Firstly the time code, located in the top right hand corner of the camera screen. The time code shows how long you've recorded for in hours, minutes, seconds and frames ( 24 frames being the heighest).
White balancing is used to capture the correct colours of the scene. This is done by zooming in and focusing the camera onto a white object then your press the white balance button on the side of the camera before zooming out again.
The aperture and shutter speed on a video camera are two very important components. Both control the exposure of the filiming. Aperture is the amount of light let into the lense and the shutter speed is how fast the frames are being captured. Focussing is also one of the key components to filming. Focussing allows you to adjust the lense so that the image your capturing is sharp and therefore good quality footage.
Once we learnt how everything worked it was time to put our knowledge to the test by actually using the video camera. In our first task we were told to film various camera shot types such as over the shoulder, close ups, wide shots and point of view shots. Many of the shots used are explained in their name how to film them, however you do have the slightly more complicated shots such as cutaway shots (A shot of something other than the current action) which take a bit more time to learn.
Filimg does also have its rules. To start off there is the rule of thrids; where the screen is cut up into 9 and the focal points are the four making the square in the centre. The lines and focal points are the hot spots of the screen and that is where we should place our points of interest when filming. When composing a shot you should try not to have a lot of free space in the background but you should also not have too much as to take away the attention from the point of itnerest. A close up of someone shouldn't cut their head off the screen but leave a small gap above their head and the movement that will take part in the scene should be thought out before filming so that you know exactly where the camera will film.
Continuity editing is basically the putting together of the shots. The shots have to be put together in order to make sense to the audience and everything in the series of shots has to be the same. For example you can't have someone being filmed in a red jacket one scene and then move onto the next shot with a jacket-less actor. The audience didn't see the actor take off the jacket so it doesn't make sense and therefore it is bad continuity.
The 180 degree rule was one that caught out some when filimg last week. The rule is that in your scene you plan where your 180 degree line is you want to film on. Once you've metophorically drawn the line you cannot cross to the other side when filming. If you do the fottage doesn't make sense seeing as the actor was just seen on the left but now all of a sudden she's on the right.
A mistake that we made during filming the first time was to place the actor in the centre of the screen, but if you remember the rule of thirds the hot spots aren't in the centre of the screen but slightly to the left or right. So in order to make the scene look more visually appealing you must place the point of interest slightly off centre.
A use of industry terminology whilst filming was also new to the majority of the class. This 'film language' is used by the director and the camera man. First of all the director will say loudly 'Stand by' in order to get the rooms attention and ready everyone into position for the take. The camera man will then say 'standing by' when s/he is ready to film. The director then says 'roll film' or 'turn over' to the camera man so that they know they should start filming. A few seconds of film is then run as the camera gets up to speed - this is often referred to as 'lead in'. Once done the Camera operator will respond 'turning over' or 'rolling' to indicate they are up to speed. 'Action!' is then called by the director to initiate the start of the screen. Generally before announcing 'cut' the director will let the scene roll on a few seconds after it's finished. This is called 'lead out'.
Using video cameras and still cameras have their similarities and differences. The exposure for example (shutter speed and aperture) are similar on both cameras. The whole concept of filming a whole scene instead of capturing one image is the main difference. In order to explain a whole scene in one image you would have to cram a lot into one photograph, whereas filming is technically a series of thousands of photographs played after one another to show the scene.
Because I am both a photography and media student I can't choose sides on whether i prefer video or still cameras. Both are used for different jobs but have an equally interesting and creative outcome.
Bubbling is kind of like a spirit level, it helps you set up the camera straight so your footage isn't wonky. You place one hand ontop of the camera, still loose and the other hand below the surface of the tripod where there is a wheel you tighten and loosen in order to fix the camera in the right place. Once you've moved the camera around to get the bubble in the centre of the green circle you tighten the wheel to fix the camera into place.
Now onto the technical side of filming. Firstly the time code, located in the top right hand corner of the camera screen. The time code shows how long you've recorded for in hours, minutes, seconds and frames ( 24 frames being the heighest).
White balancing is used to capture the correct colours of the scene. This is done by zooming in and focusing the camera onto a white object then your press the white balance button on the side of the camera before zooming out again.
The aperture and shutter speed on a video camera are two very important components. Both control the exposure of the filiming. Aperture is the amount of light let into the lense and the shutter speed is how fast the frames are being captured. Focussing is also one of the key components to filming. Focussing allows you to adjust the lense so that the image your capturing is sharp and therefore good quality footage.
Once we learnt how everything worked it was time to put our knowledge to the test by actually using the video camera. In our first task we were told to film various camera shot types such as over the shoulder, close ups, wide shots and point of view shots. Many of the shots used are explained in their name how to film them, however you do have the slightly more complicated shots such as cutaway shots (A shot of something other than the current action) which take a bit more time to learn.
Filimg does also have its rules. To start off there is the rule of thrids; where the screen is cut up into 9 and the focal points are the four making the square in the centre. The lines and focal points are the hot spots of the screen and that is where we should place our points of interest when filming. When composing a shot you should try not to have a lot of free space in the background but you should also not have too much as to take away the attention from the point of itnerest. A close up of someone shouldn't cut their head off the screen but leave a small gap above their head and the movement that will take part in the scene should be thought out before filming so that you know exactly where the camera will film.
Continuity editing is basically the putting together of the shots. The shots have to be put together in order to make sense to the audience and everything in the series of shots has to be the same. For example you can't have someone being filmed in a red jacket one scene and then move onto the next shot with a jacket-less actor. The audience didn't see the actor take off the jacket so it doesn't make sense and therefore it is bad continuity.
The 180 degree rule was one that caught out some when filimg last week. The rule is that in your scene you plan where your 180 degree line is you want to film on. Once you've metophorically drawn the line you cannot cross to the other side when filming. If you do the fottage doesn't make sense seeing as the actor was just seen on the left but now all of a sudden she's on the right.
A mistake that we made during filming the first time was to place the actor in the centre of the screen, but if you remember the rule of thirds the hot spots aren't in the centre of the screen but slightly to the left or right. So in order to make the scene look more visually appealing you must place the point of interest slightly off centre.
A use of industry terminology whilst filming was also new to the majority of the class. This 'film language' is used by the director and the camera man. First of all the director will say loudly 'Stand by' in order to get the rooms attention and ready everyone into position for the take. The camera man will then say 'standing by' when s/he is ready to film. The director then says 'roll film' or 'turn over' to the camera man so that they know they should start filming. A few seconds of film is then run as the camera gets up to speed - this is often referred to as 'lead in'. Once done the Camera operator will respond 'turning over' or 'rolling' to indicate they are up to speed. 'Action!' is then called by the director to initiate the start of the screen. Generally before announcing 'cut' the director will let the scene roll on a few seconds after it's finished. This is called 'lead out'.
Using video cameras and still cameras have their similarities and differences. The exposure for example (shutter speed and aperture) are similar on both cameras. The whole concept of filming a whole scene instead of capturing one image is the main difference. In order to explain a whole scene in one image you would have to cram a lot into one photograph, whereas filming is technically a series of thousands of photographs played after one another to show the scene.
Because I am both a photography and media student I can't choose sides on whether i prefer video or still cameras. Both are used for different jobs but have an equally interesting and creative outcome.
Wednesday, 29 September 2010
Tuesday, 28 September 2010
Photography Composition and Image manipulation
Composition:
Photography brings a visual language that is universal in understanding. We must then understand its vocabulary which consists of shapes, textures, patterns, lines, colours, shade of light to dark and sharp to blurry images. Just as we must learn to arrange words in a coherent order in order to make sense when we write or speak, so too must we put visual elements together in an organized manner if our photographs are to convey their meaning clearly and vividly.
Composition means arrangement: the orderly putting together of parts to make a unified whole; composition through a personal, intuitive act. However, there are basic principles that govern the way visual elements behave and interact when you combine them inside the four borders of a photograph. Once we have sharpened our vision and grasped these basic ideas of principles, then we will have the potential for making our photographs more exciting and effective than ever before.
In Photoshop we have learnt how to manipulate images to create new posters. In the lesson we focused mainly on the cloning tool-one of my personal favourites which allows you to copy part of the image and recreate it in another place. We were all given the poster for cloverfield as our base and we had to copy in a charactor to the foreground, erase the text at the bottom of the poster and create a reflection of our new charactor in the water.
I admit that I found it a bit hard at first but luckily I do photography aswell so photoshop wasn't completely new to me. However the fact that the reflection was the wrong way round shows the level of skill i'm at at the moment on photoshop.
In Photoshop we have learnt how to manipulate images to create new posters. In the lesson we focused mainly on the cloning tool-one of my personal favourites which allows you to copy part of the image and recreate it in another place. We were all given the poster for cloverfield as our base and we had to copy in a charactor to the foreground, erase the text at the bottom of the poster and create a reflection of our new charactor in the water.
I admit that I found it a bit hard at first but luckily I do photography aswell so photoshop wasn't completely new to me. However the fact that the reflection was the wrong way round shows the level of skill i'm at at the moment on photoshop.
About myself
My name is Natalya Holley and I am doing media at Hurtwood House. The reason that i decided to do media is because I am a big fan of music and films. My aim at the moment is to hopefully work in the music industry when I am older. The type of music I like ranges, from metal to pop. However the genre I listen to the most is probably Rock/Indie, some of my favourite bands being Enter Shikari, You Me at Six and Paramore.
For films however I like many genres but I'd have to say horror, comedy and action are my favourites. A couple of my favourite films are; Disturbia (Thriller), Dawn of the Dead (Horror) and Pineapple Express (Comedy). The last film I saw at the cinema was Toy Story 3 which doesn't really reflect my favourite genres i stated before...none the less it was a good film which appeals to children and adults because of the hidden inuendos which children won't pick up. I now find Toy Story a lot funnier than i did when i was 10.
Subscribe to:
Posts (Atom)